How To Insert A Date Picker In Word For Mac
In Microsoft Word 2016, the Developer tab provides different tools such as Codes, Add-ins, Controls, Mapping etc. The Developer tab is not visible by default, but you may add it to the tab’s list.
Also read: – How to insert an Excel sheet to Microsoft word
To display the developer tab, do the following steps:
- Click on the “File” tab.
- Click on “Options”.
- Click on “Customize Ribbon”.
- Under the right section i.e. “Customize the ribbon”, enable the check mark on “Developer”.
Now, the Developer tab will be visible. Click on “Developer” tab.
Dec 31, 2014 How to insert content controls in Word documents. Date pickers and dropdown lists. Using the Developer tab to use the commands in the Controls. To insert a date picker which always shows the current date by default before you picking up a date, please do as follows: 1.Click File Options. 2.In the Word Options dialog box, please (1) click Customize Ribbon in the left bar, (2) check Developer in the right box, and (3) click the OK button. See screenshot.
In order to create fillable forms, the following example (with detailed steps) will show you how to use various content controls such as Check Box, Combo Box, Drop down list and Date Picker in Microsoft Word 2016.
Step 1:
For using Check Box, enter a desired statement in your form and then click on “Check box Content Control” located in the ribbon toolbar.
For instance, we have entered a statement which is “Would you like to exit?” with a check box content control.
Step 2:
For using Date Picker Content Control, enter a desired statement for date in your form and then click on “Date Picker Content Control” located in the ribbon toolbar.
For instance, we have entered a statement which is “Enter a date” with a Date Picker Content Control.
Step 3:
For using Combo Box Content Control, enter a desired statement in your form for choosing a particular item and then click on “Combo Box Content Control”.
For instance, we have entered a statement which is “Choose your favourite color” with a Combo Box Content Control.
Step 4:
For using Drop-Down List Content Control, enter a desired statement in your form for choosing a particular item and then click on “Drop-Down List Content Control”.
For instance, we have entered a statement which is “Pick any animal” with the Drop-Down List Content Control.
Step 5:
Now, as we have entered all content control options, we need to save the file as a “Template”. For Saving the file, click on “File” tab positioned at the upper left corner of the Word Document window.
Step 6:
Click on “Save As”.
Step 7:
Choose a desired location to save your file. Enter a file name and choose to save the file as “Word template” given in the drop down list.
Step 8:
Click on “Save”.
Step 9:
In the Developer tab, click on “Design Mode”. The design mode will fill the suitable data (Form Options) to be selected as a choice by the user.
Step 10:
For the Check Box Content Control, right click on the middle of the icon and click on “Properties”.
FileMaker Pro Advanced includes all of the features of FileMaker Pro plus a set of advanced development and customization tools. Get features to design and develop custom apps faster and easier. Plus, get robust analysis capabilities, powerful diagnostic tools, and much more. Filemaker pro 13 torrent free download - FileMaker Pro, FileMaker Server, FileMaker Pro xDBC, and many more programs. FileMaker Pro is a cross-platform relational database application from FileMaker Inc., formerly Claris, a subsidiary of Apple Inc. It integrates a database engine with a GUI-based interface, allowing users to modify the database by dragging new elements into layouts, screens, or forms. . Dettagli Torrent globale Commenti (0. FileMaker Pro Advanced 1603 Mac OS X Multilanguage Serial - Download via torrent: Categoria bittorrent: App Mac: Descrizione: FileMaker Pro Advanced 16.0.3 Create custom apps to meet your unique business needs New FileMaker 16 Platform serial inside. Filemaker pro mac torrent ita il. FileMaker 18 Mac torrent mac is the world’s best software for creating apps for Windows, Mac, Linux, iPad, and others just like a professional. The activation code includes the latest features that contain a large amount of information and let you manage easily while solving all your problems for an educational purpose.
Step 11:
If you wish to change the symbol of check box, make the necessary changes in your desired form and click on “OK”.
Step 12:
For the Date Picker Content Control, right click on the middle of the icon and click on “Properties”.
Step 13:
Choose an appropriate format for entering date in your form. Click on “OK” after making your desired changes.
Step 14:
For the Combo Box Content Control, right click on the middle of the icon and click on “Properties”.
Step 15:
Click on “Add” to fill a number of choices. After filling the choices, click on “OK”.
A user can select from the given choices or he/she can a fill a choice which is not included in the Drop-Down list.
Step 16:
For the Drop-Down List Content Control, right click on the middle of the icon and click on “Properties”.
Step 17:
Mac open source editor. Click on “Add” to fill a number of choices. After filling the choices, click on “OK”.
A user can select only a single choice from the number of choices in the Drop-Down list.
Saurav is associated with IT industry and computers for more than a decade and is writing on The Geek Page on topics revolving on windows 10 and softwares.
In the following article, we will talk about 3 different ways to insert date or time into your Word document.
It happens quite often that you have to work on a Word document for several days. Chances are each time, you may have to type date or time in the document manually to mark your operation. Certainly, typing by yourself all the time may not be a huge task. Yet, there are clever tricks to help you smooth your work and find out more capability of Word as well.
Method 1: Insert a “Date Picker Content Control”
At the very beginning, you have to know that by default, Word does not place “Developer” option on the “Menu Bar”. Thus using this way requires you to add “Developer” option to the “Menu Bar” first. And as for how to add it,please read another article: How to Insert Background Music into Your Word Document
- First and foremost, click “Developer”.
- Then click “Date Picker Content Control” in “Controls” group.
- Now click the drop-down button on the control.
- Next you can see the calendar. Just click “Today”.
- Then go to click “Properties” in “Controls” group.
- Now the “Content Control Properties” dialog box pops up. Type a name in the “Title” text box. For instance, here we type “Date”.
- Next, choose a display style.
- At last, click “OK” to save the change.
Next time, when you finish working on this document, just click the drop-down button on the control and always choose “Today”, so you can update it.
Method 2: Use Keyboard Shortcuts
Way to Insert a Date:
- Firstly, press “Alt+ Shift+ D” to get a date.
- Then click the date.
- Click “Update” or press “F9” to update the date.
Way to insert Time
- Still firstly press “Alt+ Shift+ T” to get the time.
- Click it.
- Press “F9” to update.
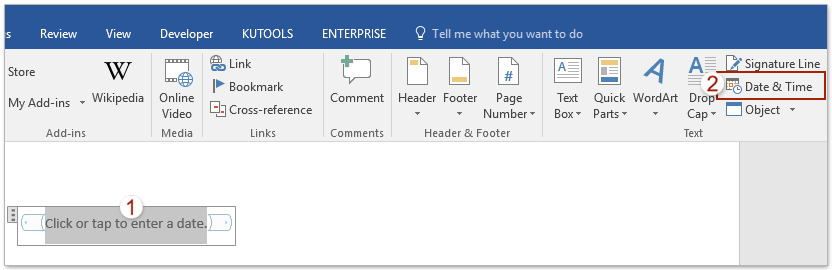
Method 3: Use “Date& Time” Option
- First of all, click “Insert”.
- Then click “Date& Time” option in “Text” group.
- Now in “Date and Time” dialog box, choose a display style first.
- Next, check “Update automatically” box.
- Finally, click “OK”.
- To update it, you have to click it first.
- Then click “Update” or press “F9” to carry out the performance.
How to Stop Update
In case you finish your document and don’t need to update time and date, you can absolutely stop it by using following solutions:
For method 1:
- First thing, right click the date.
- Then choose “Remove Content Control” option.
And for method 2 and 3, you just press “Ctrl+ Shift+ F9”.
Comparison of 3 Methods
| Methods | Advantages | Disadvantages |
Insert a “Date Picker Content Control” | 1. You can pick any date from the drop-down calendar instead of inputting manually. 2. The date picked is always valid. 3. DON’T need to remember any keyboard shortcuts. 4. More controls when inserting the date . | 1. Not convenient since we need to switch to “Developer” section and select the control accordingly. 2. Can only insert a date, not time. 3. Cannot update to current date automatically. |
| Use Keyboard Shortcuts | 1. Very convenient since we can insert with keyboard shortcuts. 2. Can insert both date and time. 3. The date/time inserted by Word is always valid. 4. Can update to current date automatically or press “F9” to update manually. | 1. Only used for inserting the current date/time. 2. User may modify the date/time manually and input invalid date/time. 3. Need to remember keyboard shortcuts. 4. No control on the date/time displayed unless we use complex field codes. |
| Use “Date& Time” Option | 1. Can insert both date and time. 2. The date/time inserted by Word is always valid. 3. Can update to current date automatically or press “F9” to update manually. 4. More controls when inserting the date and time. | 1. Only used for inserting the current date/time. 2. User may modify the date/time manually and input invalid date/time. 3. Not convenient since we need to switch to “Insert” section and select the “Date & Time” accordingly. |
Recover Lost Word Files
It’s not uncommon to lost data while working with Word yet it’s certainly not a pleasant experience, but fear not. Nowadays we have so many powerful recovery tools to repair word. So just choose one to get your file back.
Author Introduction:
Vera Chen is a data recovery expert in DataNumen, Inc., which is the world leader in data recovery technologies, including excel recovery and pdf repair software products. For more information visit www.datanumen.com